The 10 Best Sewing Blogs According to Yahoo

I just ran across this article. I have heard of some of them, and some not at all. I haven’t had the chance to look at the ones that I am not familiar with, but I wanted to pass them along to you before I forget.

Check out the 10 they deem the best and let me know what you think. How many of these blogs will become part of your bookmark collection?

Sewing is exciting. Some people sew the most basic stitches and simple projects, but they provide great joy and a sense of accomplishment. Some people sew out of necessity because it is either cost effective or because it provides the freedom to create something you have been unable to find in the store. Suppose you want a linen tablecloth to match your kitchen curtains and the stores just don’t have anything that fits the bill? Then sewing one can be extremely simple and you will get exactly what you want. Sewing is sometimes just an expression of love, like making an outfit or blanket for a new born baby. You might sew a costume for your child’s school play, or resize an old suit and bring it fresh life. You might love to sew so much that you have to sell all the extra things you sew, so you can fund your hobby. Whether you are a beginning sewer or an experienced seamstress or just like to dabble in sewing crafts and ideas, these sewing blogs are some of the best on the net. They each offer something unique and worthwhile.
The Sewing Divas
This blog is a collective of 6 ladies who sew and tackle numerous sewing projects from classic dresses to sewing clothing labels to construction a Coco Chanel like jacket. Experiments with applique and reversable suede and men’s shirts, The Sewing Divas take challenges and are detail oriented and articulate. Professionally presented sewing site worth bookmarking.
http://www.thesewingdivas.blogspot.com/
Behind The Seams

Gigi, a 40 something blogger loves sewing, reading about sewing, writing about sewing and talking about sewing and buying fabric. She just can’t get enough and sewing intoxicates her. She gives you a glimpse into a sewing machine shop and her sewing room and talks about embroidery machines and sergers anything on television related to sewing. The blog is upbeat and thoughtful and like most sewing blogs, you get to see current and past sewing projects.
http://gigisews.blogspot.com/
Just Sew It
Here you can learn about thread storage for dry climates, sewing for weddings, sewing seasonal projects, learn about fabrics and sewing basics and tips and discover patterns and sewing ideas. Lots of big clear pictures and details intersperses with some rants about sewing dealerships, if you sew, you will enjoy this site.
http://www.iocchelli.com/edmonton-seamstress/
Julia’s Sewing Blog
Julia Ringma lives in Canada and has been blogging about sewing since 2005. She conquers advanced sewing like Corduroy Skirts and Jackets, where you will learn about how to pin sleeves and how to measure and cut fabric. She makes lots of patterned tote bags and jumpers and jeans as well. The pictures show closeups of step by step sewing and details her techniques. She uses, for the most part commercial patterns.
http://juliasewing.blogspot.com/
Eleanors Closet
From quilting to dress making to medieval costume sewing, this blogger details her sewing projects including mistakes she has made and how she corrected them. From linen to buttons to marking a bodice to attach a skirt for hemming, you will view the sewing projects step by step.
http://eleanorscloset.blogspot.com/
A Dress A Day
This blogger loves dresses. New dresses, vintage dresses and views dresses as something that speaks and tells a story. A Dress A Day uncovers the secret lives of dresses and vintage patterns and all talk dress and dressy. If you love to sew dresses, then this is the site for you. There are several links on dress sewing books.
http://www.dressaday.com/dressaday.html
Six And A Half Stitches

The author of the Six And A Half Stitches works with a lot of piece work and patchwork in creating small projects such as darling little baby bibs with artistic flair, and larger more involved projects. The blogger takes you through the steps from sorting fabric and deciding on the sewing project to directions on how to rescale an existing pattern to the size you need. She has a bohemian eye and her sewing creations have an artistic flair.
http://sixandahalfstitches.typepad.com/six_and_a_half_stitches/
Arts & Quilts
Arts & Quilts blog is written by a person named Rete who lives in Austin Texas. Her goal is to sell her arts and crafts so she can continue to pursue them full time. Rete quilts and crochets. She has designed her own purses and enters quilt shows. Her blog analyzes the procrastination of projects and how to go about goal setting. One day you may read about the latest craft sale at Hobby Lobby and the next day she is trying out a craft she is unfamiliar with because someone else inspired her. She offers holiday gift ideas for crafters and often links to other step by step projects she has come across on the web. She consistently posts to her blog and when she misses a day or 2 she will post pictures of what else was going on in her life with another house project. Like most craft blogs, there is a sense of peeking into one’s life and becoming part of their thought process. Rete recommend quilt books and links to other knitting and sewing artists who blog.
http://artquilts.blogspot.com/
The Wandering Quilter
If you sew with a Bernina Sewing machine, then this is the haven for you. The Wandering Quilter has Mastery Workbook downloads, private messages among registered users, and a place for your personal photo gallery of quilting projects. The Wandering Quilter talks all things Bernina and all models and features of Bernina. From gadgets and tools and accessories to instructions and the latest Bernina software, The Wandering Quilter is a must book mark site for Bernina owners.
http://cjtinkle.com/modules/wordpress/
Hearts And Needles

Sew a hand puppet or a fabric floral necklace or create your own ribbon with stitches on fabric. make fabric head bands or quilts or ruffles or curtains. If you like to sew, visit Hearts and Needles to see what Sarah is stitching up under the sun.
http://www.heartsandneedles.com/
Those were the Top Ten Sewing Blogs but visit this too:
The Stitcher’s Guild
Although this is not a blog, it is a forum recommended by many sewing bloggers because of the wealth of information on sewing from fabrics to tools and notions to sewing for profit and creating a fashionable wardrobe and much more.
http://artisanssquare.com/sg/index.php  

Bell Bottomed Flower Children

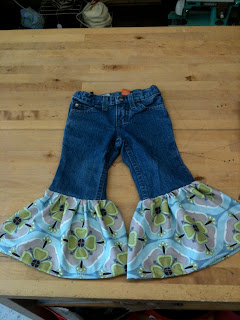
A customer of mine came in the other day wanting to do something to extend the life of her toddlers jeans that she had grown out of. I think she came up with the most adorable idea! She’s not a stitcher herself, so she just needed some help wit the execution.


This blog post is all about what we came up with and how you can do it too!

Here is the before:

Here is the after:

Here is the How-To:

1. Cut the toddler jeans just below the knee, straight across. Do one first and then fold the pair of jeans in half to get the other leg even.

2. Cut two pieces of groovy fabric that are twice as wide as the jeans where you cut them off. The pieces should also be long enough to extend past where the too-short jeans stopped. Also add an additional 1 1/2″ for seam allowance & hem.

3. Hem the bottom of the fabric extension pieces with two small 1/2″ inch folds. Hemming cotton fabrics is best done with an iron. Stitch the hem at the top of the fold so both layers of the fold get stitched.

4. Put your sewing machine on the longest stitch length it has, and set your machine tension slightly loose. Sew along the edge of the ring that is not hemmed, leaving nice long threads at each end. Do not back stitch.

5. Gather this side of the fabric extension piece so it’s as wide as the cut off pant leg, plus an inch for seam allowance. Tie each end of the long thread pieces so the gather stays.

6. Fold this piece in half so the bottom hems & gathered ends touch each other and you form a ring with each of the fabric extension pieces.

6. Place the gathered extension fabric pieces, with right sides up onto the cut off jeans and match edges. Make sure the gathers are even all the way around the pant leg and pin the fabric to the end of the jean pant legs.

 7. With a 1/2″ seam allowance, stitch the fabric extension piece to the jean pant leg on each side.

8. Trim all your threads and you’ve got yourself some groovy bell bottoms for that flower child in your life.

Tips for sewing Vintage Sewing Patterns

So we just wrapped up our Fashion Lab Vintage Dresses class this past month. We had such a blast teaching it and people had such a great time making all the vintage dress, we’ll be offering it again right away on Wednesday nights on September. All four of the styles of dress (no matter which era they were from) were completely fashionable in today’s standards and it was so fun to see how sewing patterns have changed since way back in the day.

In the class we learn how to make four different vintage dress styles based on the actual sewing patterns from the 1950’s, 1960’s & 1970’s. There were certain things that rang true each week, no matter what we were making.  I wanted to share with you three major tips for using vintage sewing patterns to make garments.

1. Vintage pattern pieces are VERY fragile. In order to make them a little safer to copy and cut your fabric from them, before each class I would reinforce them. Usually this meant using packaging tape to tape the actual paper patterns onto interfacing and reinforce in the spots that needed it. I suppose if you have a fancy laminating machine that would work too. But I don’t have one of those, so the tape worked for me. And actually by sewing it to a light weight interfacing, it made it sturdy, but also malleable enough to make it easy to cut the smaller sizes by folding the edges under.

2. Sizing can be tough! Vintage dress patterns came in only one size and the sizing is completley different from today’s sizing standards depending on when the pattern came out. I found that it was easiest to make a version of the dress we were doing that week in the size that was stated on the package and then determine (based on today’s sizing standards) what size it is in today’s sizing. Or if you wanted to get a bit more technical about it, determine how big the waist, hip & bust measurements are for the size of the pattern and scale out (or in for the skinny minnies) based on how much bigger you need it to be. Or as we found in the class, when in doubt, make it too big and size it down to fit your measurements by adding darts and pleats.


3. Yardage Recommendations on the package of the pattern are different for older patterns. One the envelop you will find yardage recommendations that may be confusing.  The reason is that back in day, fabric came in narrower widths then they are today. It was commonplace to find fabric widths measuring 36″ & 39″. Now most fabric widths are 45, 55 or 60″ wide

I hope this helps! I know it helped us in the class a ton.

You’ll see that most pattern companies that are still around today have re-issued patterns based on their vintage styles from years ago. This will have taken care of many of the above issues. But isn’t it more fun to not be afraid to tackle the genuine vintage patterns that you find at your neighbors garage sale, or that your grandmother has had in her attic since you were a baby! Happy Sewing!

The Black Skirt Challenge

Not too long ago, we had our latest Fashion Lab Meetup.


Our group got together in Hoboken at the Clinton Social, so we could get some food and drinks while we admire each others projects. 

The challenge was this: We all met about a month ago for part one of our meetup. This was the sew-along portion of the meeting where we all brought black fabric to sew a black a-line skirt together! Pretty simple, but super fun sewing with a group, as always! 
At the end of the meetup, everyone exchanged one yard of fabric of your choice. People brough their one yard of cotton trade fabric wrapped up so you couldn’t tell what the print was. We all ended up with someone elses fabric to take home and embellish our black skirt with.


I have to say I was more than impressed with the results! 

Here are some photos from the event:

Laura rocked her skirt out with some adorable little ruffly flowers on the bottom right hand side. She was complaining about her awful fabric that she had to work with (okay, yes, it did have musical notes on it) but I think she used it in a way that was perfect to make her 
black skirt even more special

Andrea did this cool trim on the end of her skirt. You can quite see all the detail here, but the end was kind of folded and the edge of the fabric was left unfinished. Very cool!

This photo is horrible, but lauren did a similar thing with her fabric, as she added a cool border to the bottom edge of the skirt.

I was impressed with Kathy’s design as she not only made all these really cool flowers for the skirt, she treated them all with a special potion of elmers glue and water to make them super stiff! Really added an awesome 3-D effect!

And the piece de resistence was from Roslyn! She turned her simple black skirt into a complete ensemble! She used the red fabric (from the trade to create a top that had this amazing corset back. Extra point go to her because she wore exactly this outfit to work that day! Be sure to check out her photos below to really see the workmanship that went into this project!

Wear your Sewing Projects to the Art & Music Fest on Sunday

Come out for the Hoboken Art & Music Festival on Sunday May 2nd dressed in your favorite duds YOU MADE YOURSELF!

Come visit our booth (in front of Cold Stone Creamery on Washington Street) wearing something you made at an M Avery Designs Sewing Class and get coupons for sewing class discounts.

For each article of clothing and/or accessory you wear (up to 3) to our booth on Sunday you will receive a coupon that can be used towards any of the classes we teach at the studio

These coupons will be able to be used in one of three ways:

-Take $5 off ANY 2 Hour Workshop (Priced $25-$45)

-Take $20 off ANY Four Week Class (Priced at $149)

-Take $45 off ANY Fashion Lab Beginner Sewing Boot Camp (Priced at $299)

(Please note, more than one coupon cannot be used together on any class!)

Adorable Credit Card Guard Project from Readymade.com

I saw this project  by Erin Lewis on the Readymade.com website last week and immediately thought, Wow – What a useful little thing to make. It’s adorable and would come in so handy if you consider yourself a super spender. This would come in super handy everytime I am on ebay browsing vintage sewing machines…

Anyway – here is how you make it:

    1. Decorate fabric or Tyvek with whatever message will keep you from spending. (Embroidery optional.)
    2. Press fabric with an iron.
    3. Place the credit card on top of your design, leave ⅛-inch seam allowance, and mark an outline with chalk.
    4. Trim fabric (should be approximately 56 inches), with your design in the top half.
    5. Fold the fabric in half around your credit card. With fabric held taut, pin all three sides.
    6. Carefully sew around the card through both layers of fabric, using your traced outline as a guide. Reinforce stitching at each end, adding a second line of hand stitching if the first isn’t snug enough.
    7. Pull threads to the inside of seams. Trim with pinking shears to prevent fraying.
    8. Insert the guarded card into your wallet. Remove all scissors and Swiss army knives from your handbag to prevent spontaneous spending.

Big Yarn Necklace Tutorial – It’s kinda sewing…

I happen to think this necklace is awesome! Lucky for us, I just found the tutorial on the Burda Style Magazine website! Wooohooo! Who’s gonna make one with me?

Step 1 You need: scissors, 2 balls of self-striping yarn, tubular silver lurex band, grosgrain/petersham ribbon, sewing thread, needle, straight pin, silver chain

Step 2 Pull layers of various thickness off each ball of yarn, lay them in loops, and cut them off – repeating until all of the yarn has been used up.

Step 3 Twist each loop until it twists back on itself in a tight bunch. Pin the twists on the back to prevent them from coming undone.

Step 4 Lay the twisted yarn bunches next to one another in the form of your necklace, then sew them together. Weave the silver chain in and out of the yarn bunches.


Teacher First, Small Business Owner Second.

Things have been a little hectic lately around the shop because we are trying to promote our summer camp program that begins on June 21st. It’s starting to feel a little more urgent, as our camp was waaaay more full at this time of year last year. This is WAY stressful to someone that doesn’t get a weekly pay check…

Obviously there are probably a lot factors are contributing to this. I am sure the economy is a huge part of it and people are feeling a little more strapped then they felt at this time last year. But what I am thinking (and hoping) it may be just that parents haven’t yet started thinking about what is going to go on in their kids lives over the summer, as they just returned to school from spring break.

But in this frantic-ness of these last couple of weeks, promoting the heck out of our summer camp and trying to get the word out in every possible way, I was able to step back and reflect on the summer camp itself.

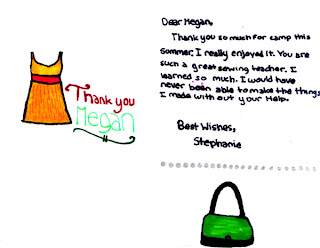
This little card helped me to remember that even though I am a business owner and one of my major goals has to be making money so I can stay in business. The other major and more important goal of my job is being the best teacher and educator I possibly can. I am able to teach kids my passion of sewing. I get paid to inspire and create and for that I am the luckiest girl on the planet.

I am good at what I do and kids LOVE coming and creating with me. This camp is going to fill itself, as it does every year and I am not going to stress about it anymore!

WIne Bottle Tiki Torch Project

Here is a great project I just found while browsing one of my favorite design blogs Re-Nest.

I’ll admit, it doesn’t look like the safest form of keeping the bugs away/lighting up your backyard, but I kinda wanna give it a try…

Here’s what you do :

What You Need

Materials
1/2″ x 3/8″ copper coupling ($0.97)
Tiki replacement wick ($1.54)
Nylon thread seal tape ($.97)
Recycled wine bottle or beer bottle (Free!)
Tools
Citronella torch fuel (price not included)

Instructions

The construction is pretty simple:
1. Wrap the pipe wrap around the copper reducer many times. The opening on our wine bottle required about 15 times around so that it would stick and we actually inserted the smaller 3/8″ side into the bottle as the 1/2″ side didn’t fit (as compared to the original How-to). In the future, we’d also want to try it in beer bottles for smaller torches to place around the yard.
2. Insert the wick into the reducer.
3. Fill the bottle with Citronella and insert wick. Let the oil be absorbed into the wick before lighting.
4. Light, enjoy & be careful!